Category Archives: Crafts

The Gingerbread Village Today

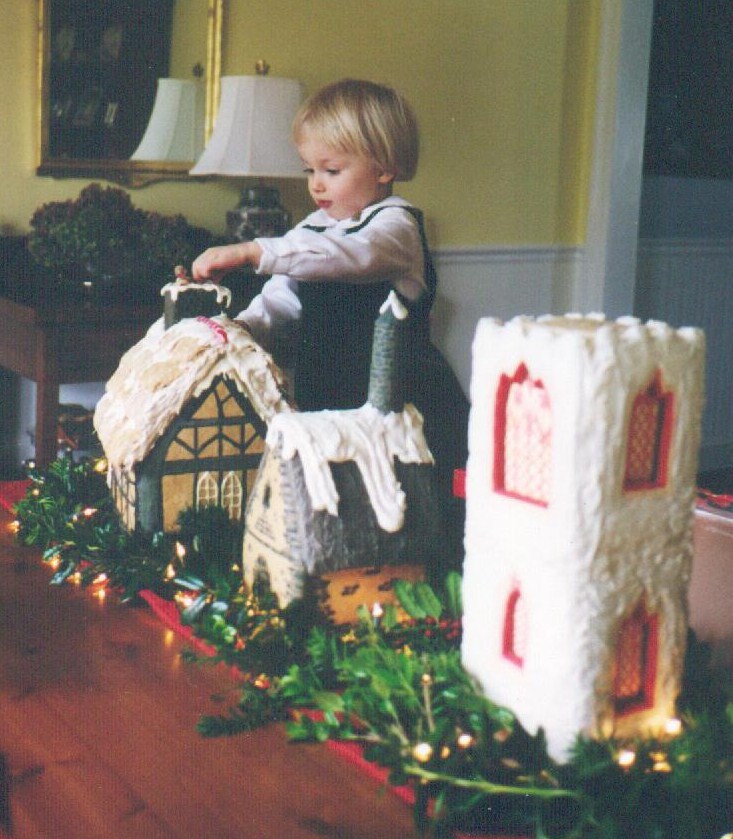
For several years it appeared that our gingerbread structures were none the worse for wear despite constant exposure to household elements. When I started to notice a few small flying moths, I searched the pantry, found nothing, and tried to ignore the problem. But the moths became more difficult to ignore.  I began to spot them regularly in the vicinity of the playroom hutch, and I was soon led to the source of the dusty-winged pests.  Our cheery, kid-friendly cottage, the first of my daughter’s and my combined efforts,  had lost its battle with an invading army of mealworms. I remembered then that I had sprayed the house only once, instead of my customary twice, with acrylic fixative. It was time to rethink the year-round gingerbread display.

The pastel candy-covered house went in the trash (despite D’s pleas that it could be saved—the poor child, I fear, has inherited a potential hoarding gene from both sides of the family). I tried to seal and pack the other buildings as thoroughly as my mother would have done. The castle, though, exceeded the size of any box I could find.  Mama would have painstakingly pieced together something that would contain it. I did not do this. I wrapped the castle in plastic, tried to tape over the unclosable box flaps, and hoped for the best. We stored all the boxes on shelves in the basement, which, incidentally, no longer flooded.


Just a few months after the village had been packed away, the inadequacy of my storage of the castle becamse dramatically apparent.  During every quick trip to the basement, a rustling, scurrying sound could be heard.  Before long, we had localized the noise to the castle box.  Clearly, it was the pitter-patter of tiny feet.  A multitude of mice had hit the housing jackpot; they were living large in a sweet, edible palace. When my husband carried the box to the back yard and opened it, five mice on a sugar high zipped out, ran right back down the steps and disappeared into the murky corners of the basement. The castle had been almost completely denuded of its abundant, exuberant royal icing. 

 
We were forced to reckon with our mice-control system.  Capturing them in humane traps, easing their nerves by feeding them Cheerios and then releasing them a couple of miles down the road at the edge of the woods was not yielding the best results.  Sadly, we adopted more stringent measures, and we no longer found evidence of mouse parties.  But the fate of the castle made me even less eager to unpack the remaining gingerbread houses as December rolled around each year.  Seven years passed.  

 
Just after Thanksgiving this year, I decided I had the time, energy and fortitude of mind to confront the stored boxes.  Still, I dreaded what I might discover. I knew that our house played host to other creatures besides mice that were likely to enjoy dining on gingerbread.

 
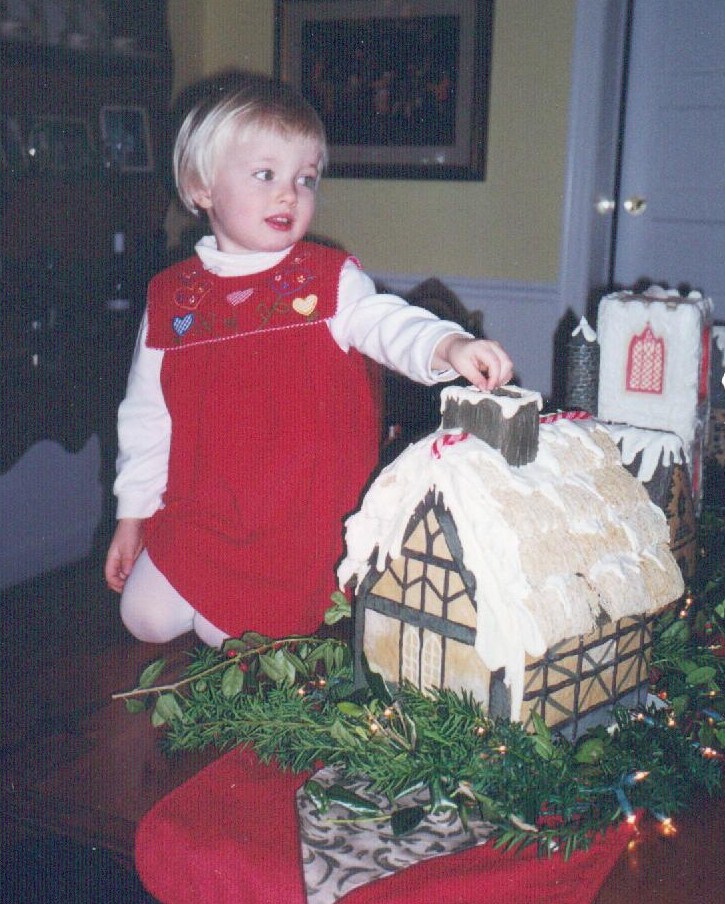
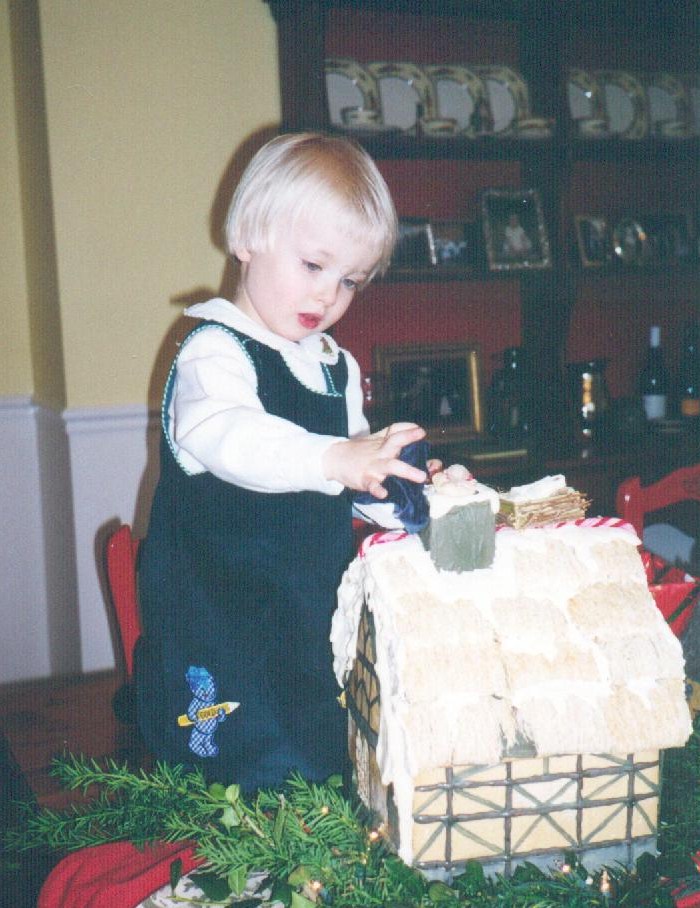
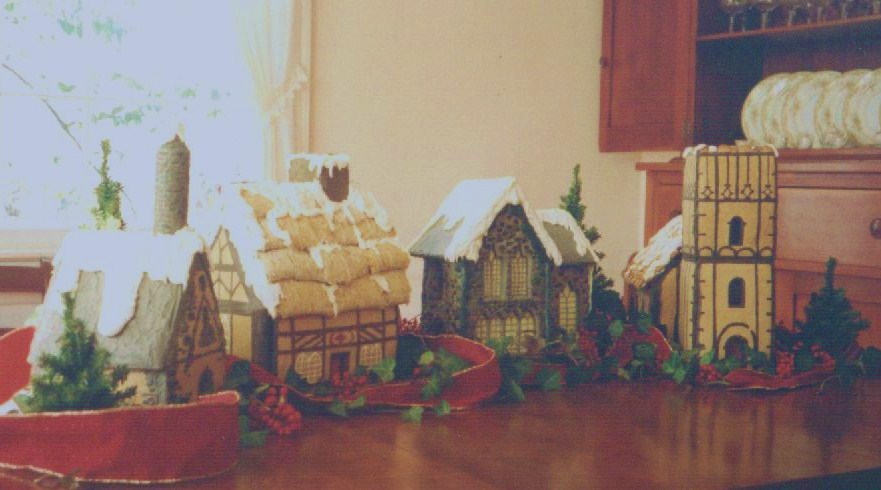
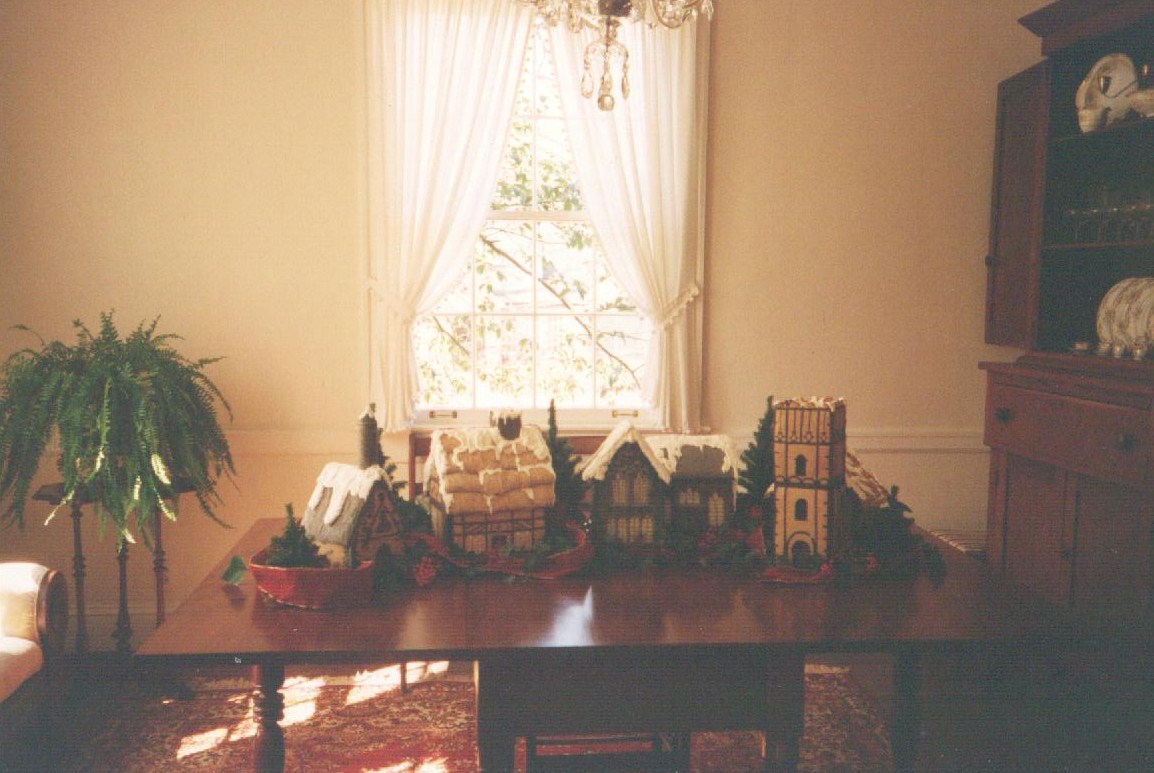
One by one, I unsealed the boxes and brought out each house.  The thatched cottage from 1989 had a few issues with its Shredded Wheat roof, but otherwise it had held up well.  The Norman church tower from 1990 was missing only a few crenellations along its roofline.  The manor house and its adjoining wing (’91 & ’92) had both survived mostly intact.  The white Gothic tower, made to commemorate our wedding in 1995, showed few signs of age.  All its surfaces had been completely covered in white royal icing, and I had expected it to have a long life.  The replica of St. Kevin’s Kitchen (’96), a playhouse-sized eleventh-century Irish chapel, looked good as new except for having lost its conical chimney cap.  Only one building was a loss.  The nave of the Norman church (’93) had succumbed to a mealworm infestation like the one that had destroyed the candy cottage.  I took each house outside to the back patio for a thorough coating of acrylic spray.  The village is back on the playroom hutch again, at least for Christmas (and perhaps through Valentine’s Day). 

Gingerbread 032
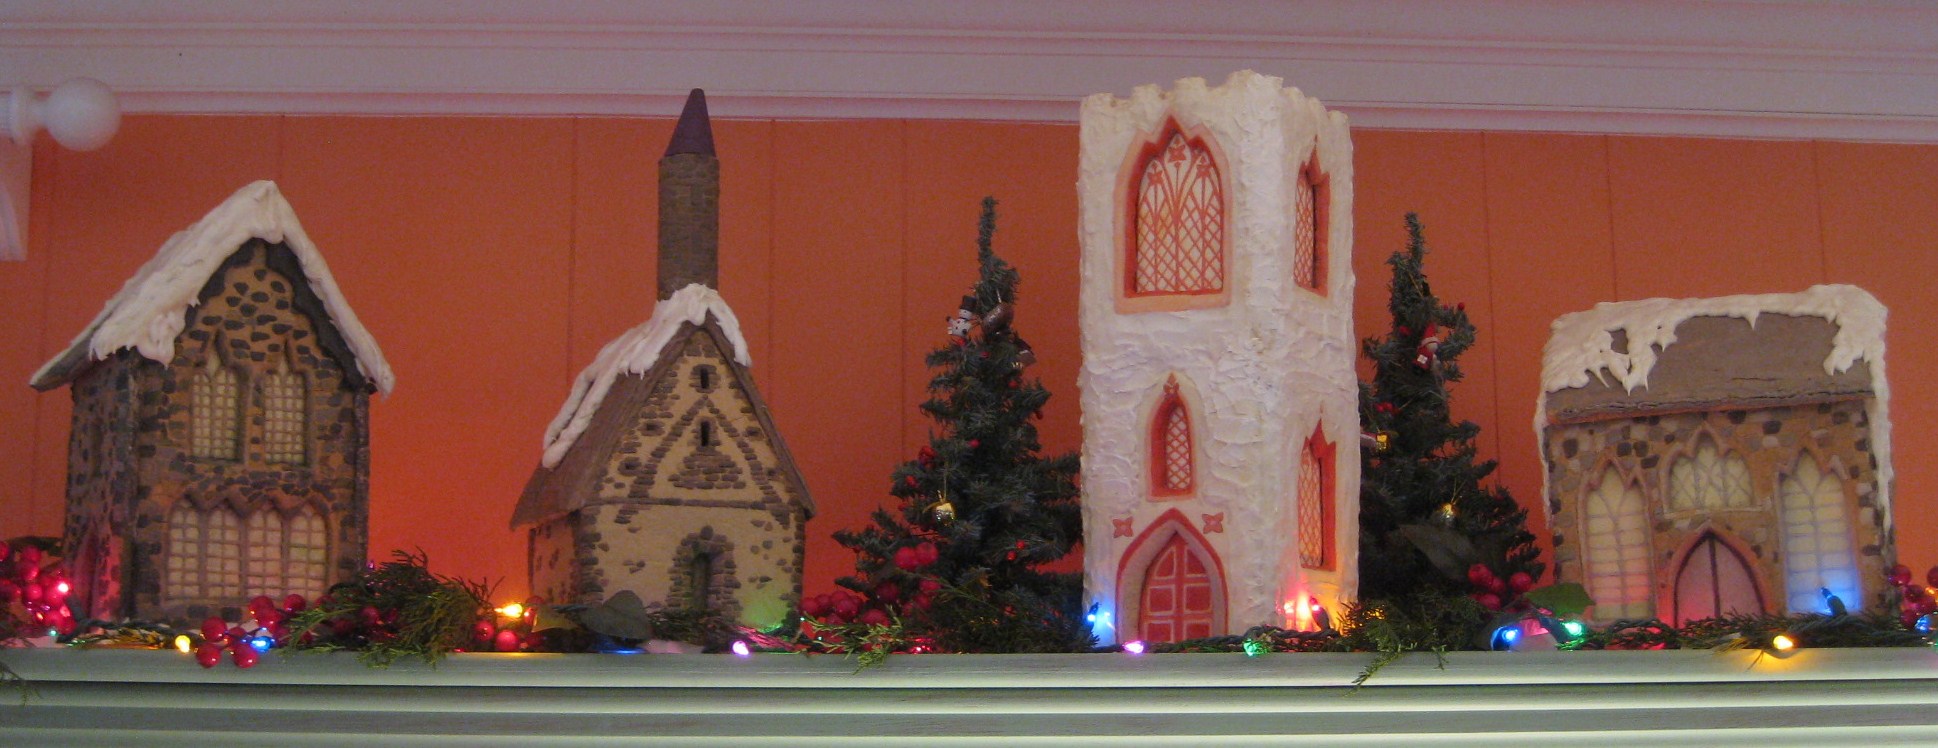
The Manor House, St. Kevin’s Kitchen (so-called because of its chimney-like tower), the Gothic Bell Tower, and Manor House Wing.             

The Gingerbread Village Relocates and Plays to a Younger Audience

003

As a toddler, our daughter’s favorite playthings were the various trappings of Christmas.  She had little use for actual toys if holiday decorations were at hand.  This led to occasional minor heartbreaks when fragile tidbits fell to pieces in her insistent little fingers, but generally she knew how to handle with care.

The first year that I unpacked the gingerbread village in Virginia, D was at my side, bubbling with excitement.  She greeted each structure with much admiration, and I was duly flattered.  She helped me arrange the buildings, some in the center of the dining room table, others atop the hutch.  D could spend hours sitting on the table, setting up various inhabitants among the houses and churches, talking to herself, happily lost in her imagination.  The village might host our clothespin nativity figures one day.  The felt Christmas mice, or a crowd of Polly Pocket dolls might have the run of the place the next day.  The possibilities were nearly endless, just like a child’s busy, growing mind.

D proved to have a knack for creating attractive baked goods.  At age three, she was a surprisingly skilled sugar cookie baker.  She turned out to be a natural with a pastry bag; her royal icing decorations were top-knotch.   Before long, she was asking to help me make a gingerbread house.  I realized that she would, indeed, be a capable assistant.

Our first mother-daughter collaboration was a modest cottage.  I gave my daughter fairly free reign in terms of decoration, so it was a colorful dream of candy and icing.  The next year, we decided to go big.  We made an elaborate, turreted gingerbread castle.  It was an appropriately exuberant candy palace for a girl who chose to wear a different princess costume every day.

Because I couldn’t face the daunting task of properly sealing, packing and storing the gingerbread village, it became a permanent display in our playroom. Our old house, as I’ve said before, is lacking in closets, and our basement used to flood with every hard rain. The absence of the perfect spot to store the village was a good excuse to simply keep it out all year long. D was glad to have it as a constant companion. Every new holiday brought another chance to redecorate.  Our Christmas village had become a town for all seasons.

007

008

D, nearly three, arranges the clothespin Mary and baby Jesus
on the roof of the thatched cottage.

My Medieval English Gingerbread Village

001

Back in 1989, home from grad school one winter break, I had enough free time to try my hand at making a gingerbread house. I had spent the previous year living in England researching my dissertation, and visions of picture-perfect country villages were rattling around in my head. I loved the quaint homes lining narrow lanes, the dwellings in use since medieval times and only gaining in charm over the centuries. I was especially fond of the thatched cottages with their half-timbered facades and slanting walls. When I saw Martha Stewart’s masterful gingerbread replica of her Turkey Hill farmhouse, I was further inspired. I liked its relative architectural correctness and its conspicuous absence of frou-frou candy cuteness typically associated with gingerbread buildings.

So I set out to make a thatched cottage. I used Martha Stewart’s recipe and diligently followed her gingerbread-baking tips. I remember thinking my mother was overly uptight when she expressed some dismay at my timing; I began rolling out the dough a day or so before our annual Christmas party. Now I know exactly how she felt. Recently I was struggling to prepare for out-of-town guests when I noted with incredulity that my daughter had plunged into an ambitious beading project that required table surfaces in several rooms. Mama, please accept my belated apology!

That first house took about a week to bake and assemble. If I had thought I could finish it by the party, I was certainly mistaken. It wasn’t even done by Christmas, as that year’s holiday photos attest; it can be glimpsed in the background, roofless, Progresso soup cans supporting its walls. But by New Year’s Eve it was complete, from its Gothic windows, snow-topped chimney and roof of Shredded Wheat, which bears a remarkable resemblance to thatch.

Gingerbread is generally considered a fragile, impermanent medium. But this is not necessarily the case. Like the thirteenth and fourteenth-century cottages I so admired in England, my first gingerbread house has had a long life. It is still with us. The strength of royal icing, a mixture of powdered sugar and egg whites, should not be underestimated, and a clear acrylic spray does wonders to protect gingerbread surfaces.

During the 90s I made other houses and several churches, all in a subdued palette and reflecting various medieval periods. A gingerbread village evolved. Each January I flew back to New Jersey, leaving my mother to deal with the increasingly time-consuming task of storing the houses. She was a faithful (if somewhat understandably resentful) curator of the collection. She kept the village on display atop the hall bookcases until after Valentine’s Day, when she sealed the houses in plastic bags and carefully taped boxes.

By the time H and I bought our home in Virginia, Mama was eager to retire as gingerbread caretaker. House by house, the village began the trek from Atlanta in the back of my parents’ station wagon. I saw, with some alarm, that it would be up to me to deal with the complicated preservation demands of theoretically edible structures prone to decay.  As in every craft project, the fun is in the design and fabrication, not in routine maintenance. I wasn’t sure I wanted this new role, but abandoning the houses to the trash bin was not an option.

003

The first four buildings of the gingerbread village, displayed
in my parents’ dining room in 1993.

New This Year: Spooky Trick-or-Treaters

SpookyGuys006

This fall, my daughter and I spent several amusing afternoons in production of these big-headed, bug-eyed trick-or-treaters to add to our Halloween decorations.  Using a Dremel, we drilled indentations for the wooden bead eyes, which we anchored with Sobo glue.  Our goal was to create a variety of strange and crazy-looking little figures, so we rather indiscriminately raided the craft closet in search of odd miscellaneous items.

For hair, we used yarn, felt, an old shade pull, and some of the stuffing that Kiko was at the time pulling out from the toy he was attacking.  Hats are acorn caps, wooden craft cups, and in one case, a plastic spider ring.  For bodies we used small spools or corks.  Toothpicks or wooden beads form the arms.  One figure received oversized white plastic hands on springs that came with a set of Halloween pencil-toppers. We made two dogs, one with ears of pecan shells, the other with wooden bead ears.  Maple leaves from a craft punch adorn several of the creatures.  We covered miniature Nerds boxes with orange paper to make trick-or-treat bags.  Because we didn’t intend our creations to be perfect or traditionally cute, no one (and I won’t name names) flew into a rage when a slight crafting hitch or two arose.

SpookyGuys009

Ready for Halloween: Papier-Mâché Jack-o’-Lantern Friends

These two jolly Jack-o’-Lantern friends were inspired by a vintage Halloween decoration my mother found in a catalogue.  Several years ago, my daughter and I made the heads out of papier-mâché, using the tried-and-true Kindergarten method of newspaper strips applied to balloons with watery white glue. For the bodies, we wired together sticks from the yard, which we draped with muslin for the gowns.  The black cloaks were formed from two mens’ drawstring shoe bags.  The friends take their place every October on our dining room sideboard.  This year we surrounded them with bittersweet branches and used two mercury-glass hurricane candle-holders for support.

DC2012003

Halloween2012003

Halloween2012007

Anticipating a happy Halloween!

Onion-Skin Eggs

These reddish-brown eggs dyed with onion skins seem appropriately colored for Good Friday.  Simply boil the eggs with lots of skins from ordinary yellow onions.  We cook the eggs at low heat for at least an hour.  The longer the boiling time, the richer and deeper the color.  The low heat helps to seal the yolk in a neat pocket.  If no cracks develop, the eggs may be kept for several years.   To create a print of leaves or flowers, using cheesecloth, wrap the plant tightly against the egg.  Tie the top and bottom ends with cooking twine and add the egg to the pot. 
Easterprep021
 

Easterprep025

Easterprep026

This egg shows the deep red color possible with a long cooking time.

Easy, Peaceful Marbleized Eggs

An easy, stress-free approach to egg decorating (much appreciated after our Ukrainian conflagration) is this technique for marbleizing eggs.  Having learned a valuable lesson, we began by boiling our eggs.  We used the dye tablets from a typical kids’ egg decorating kit, added a drop or two of olive oil, and immersed the eggs.  The results are pretty, if subtle.  No unusual tools, hot wax or flames required.   

Easterprep040

We wanted very pale colors for these eggs.
Darker hues, of course, are possible using longer dyeing times.

Easterprep041

A Dangerous Game: Ukrainian-Style Egg-Decorating

One year, Mama sent a kit for decorating eggs in the traditional Ukrainian style. A far more ambitious undertaking than our decoupage eggs, it required actual skill in addition to careful planning and immense reserves of patience.

We knew immediately that the intricate, perfect geometry of the typical Ukrainian patterns were beyond us, so we opted for simplified, free-form designs.  We diligently followed the detailed instructions, using the writing tool called the kistka to draw a design with hot beeswax.  We then immersed the egg in one of the dye colors.  This drawing and dyeing process was repeated several times.  Finally, we removed the wax by holding the egg near a candle flame.  We managed to create some attractive and unique eggs that bore no resemblance at all to those pictured in the kit.

We might have completed the project without incident had the eggs been less fragile.  As instructed, we used raw eggs.  And as we learned, one tends to grip an egg firmly while drawing on it with an unfamiliar, hot-wax dispensing tool.  Sometimes one grips too firmly, resulting in an egg being launched, missile-like, across the room.  The shattered egg stirred up the sudden and fiery wrath of my daughter.  Just as quickly, I was ignited by her anger.  Engulfed in a fit akin to spontaneous combustion, I hurled the egg I was holding onto the kitchen floor. I threw this egg (nearly-completed and painstakingly designed), with considerable force, making the inevitable clean-up all the more painful.  In a household of flammable tempers, holiday decorating has its perils.

MoreEaster004

The kit, showing some ideal Ukrainian designs.

Easterprep0291

 Only a few of our Ukrainian-inspired eggs survive.

Eastereggs007

Egg-Decorating Time

Egg decorating has always been a major concern at our house during the week before Easter.  My mother’s love of Easter crafts is almost as pronounced as her devotion to Christmas decorations.  In order to ensure the continuation of the family tradition, nearly every spring she sends new ideas for egg decorating or a specialty kit.  Several years ago, thanks to Mama, my daughter and I tried our hand at decoupage eggs.  This is a fun and relatively child-friendly approach to egg decorating.  It requires minimal skill, a bit of patience, and a tolerance for sticky fingers.  An appreciation for Mod Podge is a plus. The results can be very charming.   

Eastereggs003

Some of our favorite decoupage egg designs.


Eastereggs012

Easterprep046

The kit included several blown-out goose eggs, which offer more decorating space.  These eggs adorn our Easter tree each year.

Easterprep0482